VST Plug-in Dialog
The plug-in dialog is initially opened when a VST plug-in is loaded. After it was closed, it can be reopened by right-clicking on the plug-in slot in various places in the program (track editor, track head, mixer, object editor).
Enabling and disabling HDPI scaling for plug-ins
If a plug-in is displayed too small or blurry on high-resolution monitors, you can activate the option Force screen scaling in the plug-in menu. This setting allows Sequoia to adjust the display according to the Windows HDPI scaling.
- Active: Plug-in uses the scaling of the operating system. This can lead to a larger and blurrier display, as Windows interpolates the graphics.
- Deactivated (default): Plug-in manages scaling itself.
This setting applies globally for the affected plug-in regardless of the project. It is saved in the file VSTPlugin.ini.
If several instances of the same plug-in are open, they are automatically closed and reopened as soon as the option is changed.
Plug-in
Various settings for the plug-in can be specified using the Plug-in menu:
Plug-in dialog/Parameter dialog: By default, each plug-in is displayed with its graphical interface. Alternatively, the Parameter dialog can be displayed. In this dialog, you can select eight parameters of the plug-in, which can then be controlled via sliders. This dialog is also used if the plug-in does not have its own graphical interface.

The parameter selection is saved for each plug-in so that you can use the same parameters the next time you use the plug-in. This makes frequently used parameters of the respective plug-in available immediately after loading.
The keyboard commands F6 and Shift + F6 can be used to quickly switch between the two displays.
FX I/O Matrix (only with maintenance contract): This opens the FX I/O Matrix. This allows you to change the channel assignment of the inputs and outputs of effect plug-ins. This is particularly useful for correcting incorrect channel assignments for surround effects.
Bypass: Deactivates the instrument and mutes it. Note that some instruments consume processing power even when they are bypassed. For this reason you should remove these instruments completely if you don't need them anymore.
Monitoring: This option must be active if the instrument should be heard when playing live and recording. If you want monitoring to be enabled in the track whenever a track is armed for recording, select Tape monitoring in the System options > Audio setup > Monitoring behavior.
Receive MIDI: This option is always on for VST instruments. For MIDI controllable VST effects (e.g. vocoder plug-in with integrated synthesizer), you can activate this option so that the effect is available as a routing target for the MIDI output of a track and the audio effect can therefore be controlled via MIDI.
Send MIDI: If you activate this option, MIDI data sent from a VST plug-in can be used as MIDI input of another track.
Process MIDI only: You cannot influence this option. It indicates that the plug-in has been loaded as MIDI plug-in (see below).
Permanent options: These additional settings apply to all instances of the respective plug-in.
Note: We recommend, that you alter the Permanent Options only if compatibility problems occur. If you have made changes here, please reload the project afterwards!
Restrict to 1 CPU only: All instances of VSTi will be calculated only on one CPU. This way you can avoid a multi CPU conflict between different instances of the same plug-in. If you activate this option for an effect plug-in, all track and object effects on tracks that use this plug-in are calculated on one CPU only.
Note: When using UAD cards, this option is activated by default.
Force calculation for silent input: If you have individual tracks calculated as economy tracks via the Playback Engine, Sequoia normally does not process track effects if there is no audio signal present for a while. This decreases the load on the CPU. However, with this plug-in option you can make the plug-in in the track always calculate audio data, even if no audio signal is currently passing through the effect. This is recommended for reverb or delay plug-ins with long decay times and generally for all plug-ins that produce audio independently of their input.
Note: When using the Hybrid Engine, also empty or silent tracks are calculated by default instead. You can change this behavior in the performance options (keyboard shortcut: Y) with the options Deactivate muted tracks for ASIO and Deactivate FX on empty or silent tracks for ASIO .
No automatic copying: This option prevents automatic copying of plug-ins when you split or copy objects.
Load/Save patches/banks: Save an instrument's settings and sounds here. The standard formats for this are: *.fxp for patches or *.fxb for whole banks. Some instruments have their own patch/bank format. Settings are then usually loaded and saved directly via the instrument's interface.
Randomize parameters: Use this function to set all parameters of an instrument to a random value. For synthesizers, this option can lead to surprising results and provides interesting results for the sound design thanks to the random generation of a new sound. However, it should be noted that parameters are only set randomly if they can also be reached from the interface. With some very complex virtual synthesizers or modular systems, some parameters may not be adjustable using this option. Also note that randomly setting arbitrary parameters could generate very extreme sounds. This may lead to no sound being produced at all or extremely loud volumes and frequency ranges being reached. For this reason you should keep an eye on the monitoring volume while experimenting with this function.
Automate next parameter: The next parameter which you change during playback will be recorded via automation. You can also achieve this by holding down Ctrl + Alt together while changing the parameter with the mouse.
Hardware Controller Easy Learn: If you activate this function, you can learn your hardware controller by moving the plug-in element you want to train and by moving the element you selected at the hardware controller.
Pay attention to the following when doing this:
- When you are finished assigning the controls be sure to switch "Hardware Controller Easy Learn" off to avoid making any unwanted changes to the settings.
- The hardware controller element must first be learned in the hardware controller setup and cannot be left empty.
- Learned elements permanently modify the internal mode in the hardware controller setup. The assignment is also available later for other projects.
- Assignment can be cleared again with the Restore modes button beside the internal mode in the hardware controller setup
Detailed information about mapping hardware controllers can be found in the included PDF document Hardware_Controller.pdf in the section Customizing Controllers.
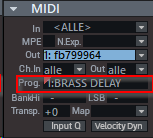
Programs
Programs features the presets for the corresponding plug-in.
Only the internal presets according to the VST standard are displayed. Many VST plug-ins have their own manufacturer-specific preset management, which is only available through the plug-in's interface.
|
|
For VST instruments: If an instrument has presets, they will also appear on the track that uses this plug-in in the MIDI section of the Track Editor at Program. If your MIDI input device can send Program Change messages, you can select programs of the instrument directly in this way. |
Sidechain Input
The sidechain is a second stereo input pair that can be used primarily by dynamics effects to control levels using a separate signal from one or more other tracks rather than the program signal itself.
A typical example for using a sidechain send is to control a compressor for the bass using the kick drum signal. This way, every time the kick drum sounds, the bass will be lowered.
If an appropriately equipped VST
In the VST standard, there is no special labeling of VST effect inputs specifically as sidechain inputs. Sequoia assumes for all VST-FX that have more than two inputs that inputs 3/4 can be used as sidechain.
Sidechain in: Activates and deactivates the sidechain function.
Sidechain solo: With this option you can listen to the sidechain signal. The effect will be switched to "Bypass", and only the input of the Sidechains will be output. When closing the plug-in dialog, the "Sidechain solo" function is automatically reset. "Side chain solo" is also ideal for acoustic control when applying the sidechain filter.
Sidechain filter: The sidechain signal can be filtered by a Parametric equalizer.
Show Sidechains
|
|
With a right-click in the AUX section of the mixer and Track Editor you can also display the sidechain sends. |

An internal sidechain bus is created in the tracks used for the sidechain signal and the sidechain send control is assigned for the destination track. Unlike AUX Sends, the track name is preceded by a > character. The signal tap of the sidechain send is preset to "Pre-fader" (fader display in yellow). This keeps the sidechain signal independent of the channel's volume.
Right-click to switch the selected sidechain to "Direct Out" (fader display in red) or "Post-fader Out" (fader display in orange), or open the Stereo panorama dialog for panorama definition of the respective sidechain send.
You can get a good overview of all assigned sidechain sends in the matrix display of the Routing Manager.